# egg-bin源码解析笔记
egg-bin是一个本地开发者工具,集成到egg中,里面涵盖了很多功能,比如调试,单元测试和代码覆盖率等这些功能,可以说是比较强大了。
下面就egg-bin源码分析一些东西(针对的是4.13.2)
egg-bin如何工作的:
在本地运行egg项目的时候,我们往往会根据不同的场景(调试、测试等)来选择不同的命令(egg-bin dev、egg-bin debug)启动项目,从而达到我们需要的效果,但是egg-bin是如何让命令运行起来的呢?
比如在命令行中回车下面的命令:
$ egg-bin dev --port 7001
开始进入node_modules/egg-bin/bin/egg-bin.js文件,文件代码比较简单:
#!/usr/bin/env node
'use strict';
const Command = require('..');
new Command().start();
2
3
4
其中,Command对应的是node_modules/egg-bin/bin.egg-bin.js中的EEggBin对象。首先理清以下egg-bin中对应的几个对象之间的关系,如下图:
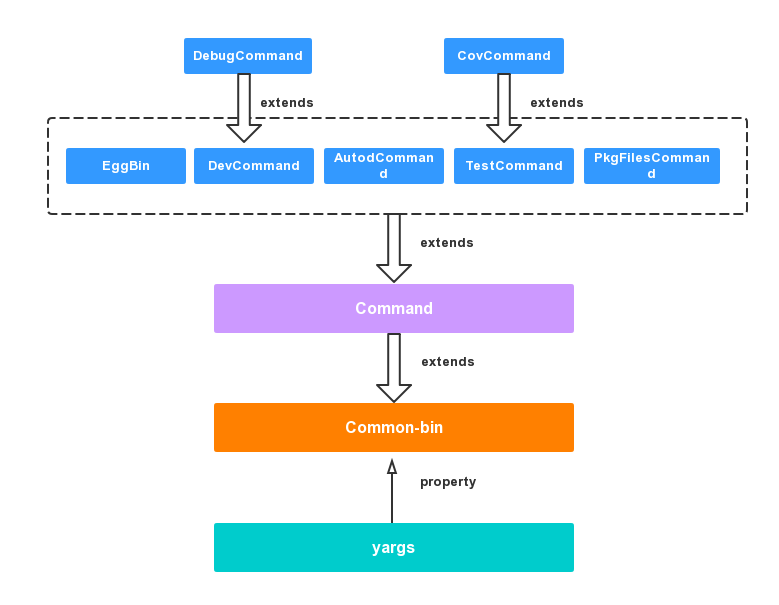
其中最后导出的EggBin对象以及DevCommand、AutodCommand、TestCommand、PkgFilesCommand继承于egg-bin/lib/command.js里面导出的Command对象,而egg-bin/lib/command.js里面导出的Command又是继承于第三库command-bin (opens new window),而command-bin中导出的CommandBin对象又是一个yards属性,该属性是目前比较流行的命令工具yargs (opens new window)。DebugCommand和CovCommand则分别继承自DevCommand和TestCommand。
进入index.js文件源代码,该文件至少定义了EggBin这个对象,并且将一些sub command挂载到EggBin这个导出对象中,有如下几个自命令:
// load directory
this.load(path.join(__dirname, 'lib/cmd'));
2
- Command --- 继承自 common-bin的基础命令对象
- CovCommand --- 代码覆盖率命令对象
- DevCommand --- 本地开发命令对象
- TestCommand --- 测试命令对象
- DebugCommand --- 调试命令对象
- PkgfilesCommand --- 包文件对象
接着就是执行bin/egg-bin.js文件中的new Command().start()这一行,首先会先去执行EggBin构造函数中的内容:
class EggBin extends Command {
  constructor(rawArgv) {
    // 获取用户输入的options
    super(rawArgv);
    this.usage = 'Usage: egg-bin [command] [options]';

    // load 对应目录下的command文件
    this.load(path.join(__dirname, 'lib/cmd'));
  }
}
2
3
4
5
6
7
8
9
10
# 获取命令参数
由于上面的继承关系,第一行就会直接执行到Command-bin/lib/command.js中的第一行
/**
  * original argument
  * @type {Array}
  */
this.rawArgv = rawArgv || process.argv.slice(2);
2
3
4
5
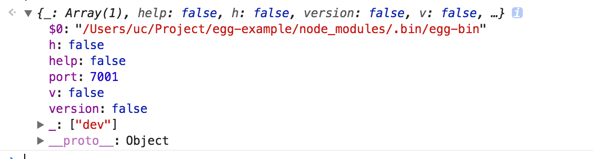
此时 this.rawArgv的值如下:
0: "dev"
1: "--port"
2: "7001"
2
3
# load 配置文件
获取到这个参数之后就会直接将该参数传给yargs并将yyargs对象赋给自己的一个yargs属性
/**
  * yargs
  * @type {Object}
  */
this.yargs = yargs(this.rawArgv);
2
3
4
5
然后就开始load命令行文件了,通过追踪,也可以发现最后执行的也是common-bin中的load命令common-bin中的load成员函数,该函数要求参数是所需要获取的命令文件的绝对路径,其中common-bin/command.js中的load源码如下:
load(fullPath) {
    // 省略对参数的校验
    // load entire directory
    const files = fs.readdirSync(fullPath);
    const names = [];
    for (const file of files) {
      if (path.extname(file) === '.js') {
        const name = path.basename(file).replace(/\.js$/, '');
        names.push(name);
        this.add(name, path.join(fullPath, file));
      }
    }
   // 省略
  }
2
3
4
5
6
7
8
9
10
11
12
13
14
其中files文件的值为egg-bin/lib/cmd下文件名称:
0: "autod.js"
1: "cov.js"
2: "debug.js"
3: "dev.js"
4: "pkgfiles.js"
5: "test.js"
2
3
4
5
6
然后将files进行遍历,执行下面的add的操作:
  /**
   * add sub command
   * @param {String} name - a command name
   * @param {String|Class} target - special file path (must contains ext) or Command Class
   * @example `add('test', path.join(__dirname, 'test_command.js'))`
   */
 add(name, target) {
    assert(name, `${name} is required`);
    if (!(target.prototype instanceof CommonBin)) {
      assert(fs.existsSync(target) && fs.statSync(target).isFile(), `${target} is not a file.`);
      debug('[%s] add command `%s` from `%s`', this.constructor.name, name, target);
      target = require(target);
      assert(target.prototype instanceof CommonBin,
        'command class should be sub class of common-bin');
    }
    this[COMMANDS].set(name, target);
  }
2
3
4
5
6
7
8
9
10
11
12
13
14
15
16
17
其中要求 参数target也是对应的文件的绝对路径。在进行条件判断之后直接使用set将该命令挂载在this[COMMANDS]变量中。遍历完成后this[COMMANDS]的值如下所示:

# 执行start()
最重要的start操作,追根溯源也是执行的common-bin里面的start(), start()里面主要使用co包了一个generator函数,并且在genertor函数中执行了this[DISPATCH],然后,重头戏来了,this[DISPATCH]的源码如下:
  /**
   * dispatch command, either `subCommand.exec` or `this.run`
   * @param {Object} context - context object
   * @param {String} context.cwd - process.cwd()
   * @param {Object} context.argv - argv parse result by yargs, `{ _: [ 'start' ], '$0': '/usr/local/bin/common-bin', baseDir: 'simple'}`
   * @param {Array} context.rawArgv - the raw argv, `[ "--baseDir=simple" ]`
   * @private
   */
  * [DISPATCH]() {
    // define --help and --version by default
    this.yargs
      // .reset()
      .completion()
      .help()
      .version()
      .wrap(120)
      .alias('h', 'help')
      .alias('v', 'version')
      .group([ 'help', 'version' ], 'Global Options:');

    // get parsed argument without handling helper and version
    const parsed = yield this[PARSE](this.rawArgv);
    const commandName = parsed._[0];

    if (parsed.version && this.version) {
      console.log(this.version);
      return;
    }

    // if sub command exist
    if (this[COMMANDS].has(commandName)) {
      const Command = this[COMMANDS].get(commandName);
      const rawArgv = this.rawArgv.slice();
      rawArgv.splice(rawArgv.indexOf(commandName), 1);

      debug('[%s] dispatch to subcommand `%s` -> `%s` with %j', this.constructor.name, commandName, Command.name, rawArgv);
      const command = this.getSubCommandInstance(Command, rawArgv);
      yield command[DISPATCH]();
      return;
    }

    // register command for printing
    for (const [ name, Command ] of this[COMMANDS].entries()) {
      this.yargs.command(name, Command.prototype.description || '');
    }

    debug('[%s] exec run command', this.constructor.name);
    const context = this.context;

    // print completion for bash
    if (context.argv.AUTO_COMPLETIONS) {
      // slice to remove `--AUTO_COMPLETIONS=` which we append
      this.yargs.getCompletion(this.rawArgv.slice(1), completions => {
        // console.log('%s', completions)
        completions.forEach(x => console.log(x));
      });
    } else {
      // handle by self
      yield this.helper.callFn(this.run, [ context ], this);
    }
  }
2
3
4
5
6
7
8
9
10
11
12
13
14
15
16
17
18
19
20
21
22
23
24
25
26
27
28
29
30
31
32
33
34
35
36
37
38
39
40
41
42
43
44
45
46
47
48
49
50
51
52
53
54
55
56
57
58
59
60
61
首先会去执行yargs中的一些方法,这里common-bin只是保留了yargs中一些对自己有用的方法,比如completion()、wrap()、alias()等,具体关于yargs的API可以移步这里 (opens new window)。接着是执行this[PARSE]将rawArgv进行处理,处理后的parse对象结构如下:
接着就是对获取到的命令行进行校验,如果存在this[COMMAND]对象中就执行。在当前例子中也就是去执行DevCommand。而由于DevCommand最终也是继承于common-bin的,然后执行yield command[DISPATCH]();又是递归开始执行this[DISPATCH]了,直到所有的子命令递归完毕,才会去使用helper(common-bin中支持的异步关键所在)类继续执行每个command文件中的*run()函数。
# egg-bin中的子命令文件
dev.js
作为在egg项目中本地开发最为重要的开发命令,dev.js无疑肩负着比较重要的指责。在dev.js中,主要是定义了一些默认的端口号,以及入口命令等。*run的源码如下:
  * run(context) {
    const devArgs = yield this.formatArgs(context);
    const env = {
      NODE_ENV: 'development',
      EGG_MASTER_CLOSE_TIMEOUT: 1000,
    };
    const options = {
      execArgv: context.execArgv,
      env: Object.assign(env, context.env),
    };
    debug('%s %j %j, %j', this.serverBin, devArgs, options.execArgv, options.env.NODE_ENV);
    yield this.helper.forkNode(this.serverBin, devArgs, options);
  }
2
3
4
5
6
7
8
9
10
11
12
13
主要是对当前的上下文参数进行转化并对端口进行了一些处理,然后就开始调用helper的forkNode来执行入口命令,其中this.serverBin的值为:Users/uc/Project/egg-example/node_modules/egg-bin/lib/start-cluster,下面的事情可以异步这里进行了解:
debug.js
有上分析可知,DebugCommand继承于DevCommand,所以在constructor的时候就会去执行dev中的一些options,而且在debug.js中的*run函数中直接调用的是dev.js中的formatArgs()参数处理。关键源码(有删减)如下:
 * run(context) {
    const proxyPort = context.argv.proxy;
    context.argv.proxy = undefined;

    const eggArgs = yield this.formatArgs(context);
    //省略部分

    // start egg
    const child = cp.fork(this.serverBin, eggArgs, options);

    // start debug proxy
    const proxy = new InspectorProxy({ port: proxyPort });
    // proxy to new worker
    child.on('message', msg => {
      if (msg && msg.action === 'debug' && msg.from === 'app') {
        const { debugPort, pid } = msg.data;
        debug(`recieve new worker#${pid} debugPort: ${debugPort}`);
        proxy.start({ debugPort }).then(() => {
          console.log(chalk.yellow(`Debug Proxy online, now you could attach to ${proxyPort} without worry about reload.`));
          if (newDebugger) console.log(chalk.yellow(`DevTools → ${proxy.url}`));
        });
      }
    });

    child.on('exit', () => proxy.end());
  }
2
3
4
5
6
7
8
9
10
11
12
13
14
15
16
17
18
19
20
21
22
23
24
25
26
此处首先是开启egg,做的是和dev里面一样的东西,然后则是实例化InspectorProxy进行debug操作,在命令行打印出devtools的地址。
test.js
这个命令主要是用来运行egg项目中的test文件的,也就是跑我们自己写的测试用例,关于如何写单元测试,可以异步单元测试 (opens new window),在这个文件,*run形式也和上面类似,然后调用this.formatTestArgs(),formatTestArgs源码如下(有删减):
  /**
   * format test args then change it to array style
   * @param {Object} context - { cwd, argv, ...}
   * @return {Array} [ '--require=xxx', 'xx.test.js' ]
   * @protected
   */
  * formatTestArgs({ argv, debugOptions }) {
    const testArgv = Object.assign({}, argv);

    /* istanbul ignore next */
    testArgv.timeout = testArgv.timeout || process.env.TEST_TIMEOUT || 60000;
    testArgv.reporter = testArgv.reporter || process.env.TEST_REPORTER;
    // force exit
    testArgv.exit = true;

    // whether is debug mode, if pass --inspect then `debugOptions` is valid
    // others like WebStorm 2019 will pass NODE_OPTIONS, and egg-bin itself will be debug, so could detect `process.env.JB_DEBUG_FILE`.

    if (debugOptions || process.env.JB_DEBUG_FILE) {
      // --no-timeout
      testArgv.timeout = false;
    }

    // collect require
    let requireArr = testArgv.require || testArgv.r || [];
    /* istanbul ignore next */
    if (!Array.isArray(requireArr)) requireArr = [ requireArr ];

    // clean mocha stack, inspired by https://github.com/rstacruz/mocha-clean
    // [mocha built-in](https://github.com/mochajs/mocha/blob/master/lib/utils.js#L738) don't work with `[npminstall](https://github.com/cnpm/npminstall)`, so we will override it.
    if (!testArgv.fullTrace) requireArr.unshift(require.resolve('../mocha-clean'));

    requireArr.push(require.resolve('co-mocha'));

    if (requireArr.includes('intelli-espower-loader')) {
      console.warn('[egg-bin] don\'t need to manually require `intelli-espower-loader` anymore');
    } else {
      requireArr.push(require.resolve('intelli-espower-loader'));
    }

    // for power-assert
    if (testArgv.typescript) {
      // remove ts-node in context getter on top.
      requireArr.push(require.resolve('espower-typescript/guess'));
    }

    testArgv.require = requireArr;

    let pattern;
    // changed
    if (testArgv.changed) {
      pattern = yield this._getChangedTestFiles();
      if (!pattern.length) {
        console.log('No changed test files');
        return;
      }
    }

    if (!pattern) {
      // specific test files
      pattern = testArgv._.slice();
    }
    if (!pattern.length && process.env.TESTS) {
      pattern = process.env.TESTS.split(',');
    }

    // collect test files
    if (!pattern.length) {
      pattern = [ `test/**/*.test.${testArgv.typescript ? 'ts' : 'js'}` ];
    }
    pattern = pattern.concat([ '!test/fixtures', '!test/node_modules' ]);

    // expand glob and skip node_modules and fixtures
    const files = globby.sync(pattern);
    files.sort();

    if (files.length === 0) {
      console.log(`No test files found with ${pattern}`);
      return;
    }

    // auto add setup file as the first test file
    const setupFile = path.join(process.cwd(), 'test/.setup.js');
    if (fs.existsSync(setupFile)) {
      files.unshift(setupFile);
    }
    testArgv._ = files;

    // remove alias
    testArgv.$0 = undefined;
    testArgv.r = undefined;
    testArgv.t = undefined;
    testArgv.g = undefined;
    testArgv.typescript = undefined;

    return this.helper.unparseArgv(testArgv);
  }
2
3
4
5
6
7
8
9
10
11
12
13
14
15
16
17
18
19
20
21
22
23
24
25
26
27
28
29
30
31
32
33
34
35
36
37
38
39
40
41
42
43
44
45
46
47
48
49
50
51
52
53
54
55
56
57
58
59
60
61
62
63
64
65
66
67
68
69
70
71
72
73
74
75
76
77
78
79
80
81
82
83
84
85
86
87
88
89
90
91
92
93
94
95
96
97
98
代码里面的注释很清楚了,就是将单元测试的一些库push进requireArr的值如下:

其中mocha-clean是清除上一次mocha遗留的堆栈了,后面两个就是egg选用的测试框架和断言库了。
然后就是加载egg项目中除掉node_modules和fixtures里面的test文件,即项目层面的*.test.js后面也就是开启进程进行单元测试。
cov.js
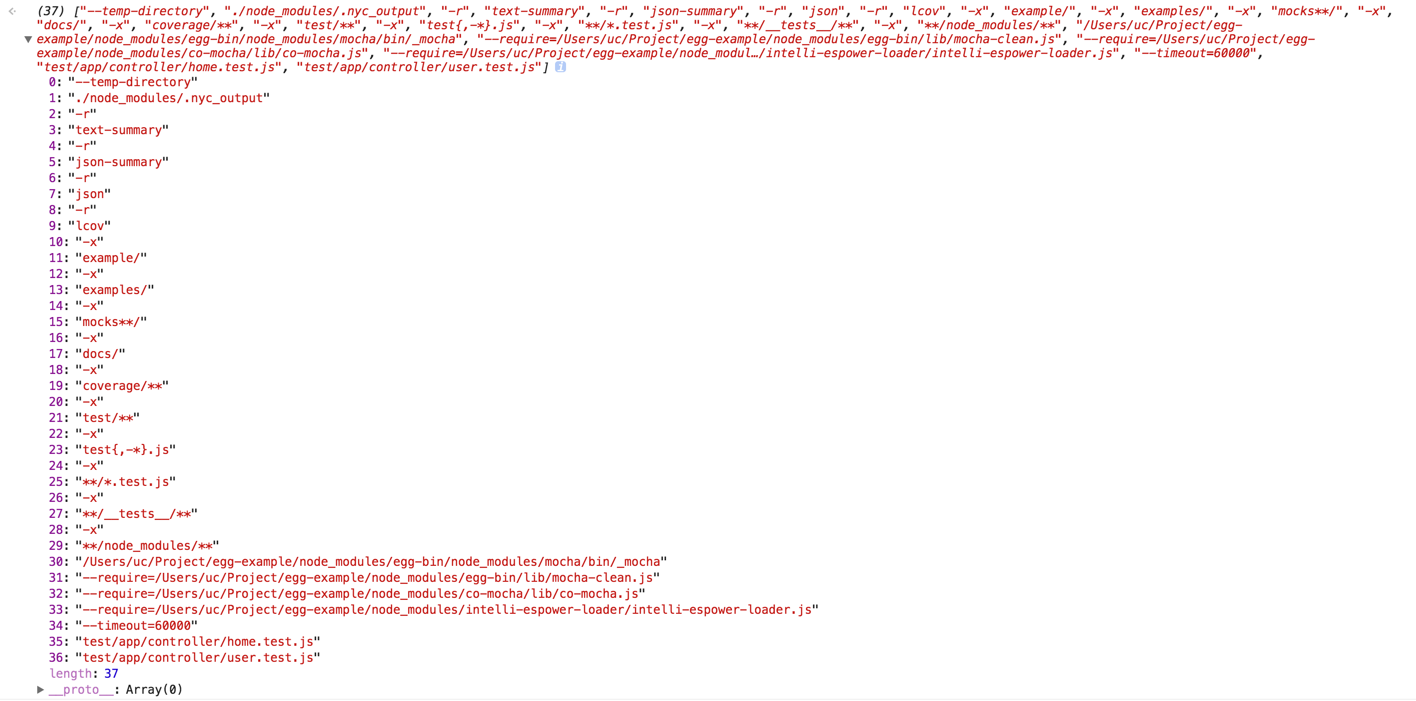
cov.js是用来测试代码的覆盖率的。其中CovCommand继承自TestCommand,在cov的*run中主要定义了字段,比如exclude、nycCli、coverageDir、outputDir等。根据英文命名就知道是什么意思了。然后继续执行getCovArgs是对参数的一些处理,源码也就很简单,就不贴出来了,在getCovArgs中将上面test.js中的承诺书一起concat进来了,最后返回的covArgs的样子是这样的:
然后又是开启进程了。
autod.js和pkgfiles.js
这两个比较简单,这里就不再赘述了
# 总结
整个egg-bin看下来,还是很厉害的,涉及的都是我之前没听过或者听过但是没用过的高大尚的东西,比如commander.js,yargs,mocha,co-mocha,power-assert,istanbuljs,nyc,